Ultimate Skyrim
UNSUPPORTED MODLIST: Ultimate Skyrim is no longer developed or maintained. This guide is archived reference only. Installation support is not available. If you encounter issues, search Discord #ultsky-faq channel for previous solutions. See FAQ for common problems.
Table of Contents
Table of contents
Overview
Ultimate Skyrim requires Skyrim Legendary Edition (Classic Edition with all DLC). You can find purchase links on Reddit: How to get Skyrim LE in 2021
System Requirements
| Tier | GPU | CPU | RAM |
|---|---|---|---|
| Recommended | GeForce GTX 970 or higher | Intel Core i5-7500 or higher | 8 GB or more |
| Minimum | GeForce GTX 660 or equivalent | AMD Ryzen 3 2200G or equivalent | 4 GB or more |
Pre-Installation Checklist
Before starting, ensure you have:
- At least 40 GB free space
- An archive tool (7-Zip or WinRAR)
- Latest Microsoft Visual C++ (32-bit and 64-bit)
- Latest .NET Framework Runtime
- NO Skyrim mod subscriptions from Steam Workshop
- Clean, ENGLISH Skyrim 1.3.22 installed through Steam
- NOT the GamePass version of Skyrim
Recommended: Nexus Premium membership for automated downloads
You can view the modlist here
Note (06/09/24): Bethesda updated Skyrim via Steam. You may need to downgrade using Steam depot
download_depot 72850 72853 3817241784354177437. See downgrade instructions.
Installation Process
STEP 1: Prepare Game Files
- Launch “The Elder Scrolls V: Skyrim” from Steam
- When launcher offers auto-detect settings, click “OK” and dismiss the follow-up
- Click “Play” to launch the game
- From main menu, select “Quit” to return to desktop
This generates necessary files for Ultimate Skyrim installation.
STEP 2: Download & Install with Wabbajack
-
Extract and place “UltSky” folder in desired location
Installation Location Restrictions - Do NOT place in:
- Program Files / Program Files (x86)
- Users folder or subfolders
- Steam folder or subfolders
- Skyrim folder or subfolders
- Desktop or Documents folders
- Folders with non-English characters
- Cloud storage (Dropbox, OneDrive, etc.)
-
Download latest Wabbajack and place in
UltSky\installer\folder -
Download Manually the Wabbajack File from here
-
Double-click Wabbajack.exe to run
-
Click “Install From Disk” and locate the Wabbajack file you downloaded
-
Select your
contentfolder as installation location (NOT the Skyrim folder)WARNING: Select the
contentfolder, NOTSkyrim\TESV.exe. Selecting wrong folder will break your install! -
(Optional) If upgrading, select your old Downloads folder to reuse existing downloads
-
Click the install button to begin
-
If prompted, click “Accept” for Nexus API
-
(Optional) If not a Nexus Premium member, follow this guide for manual downloads
-
When complete, click “Install Folder”
-
Open “Game Folder Files” and copy all files inside
-
Navigate to your Skyrim root folder and paste files
-
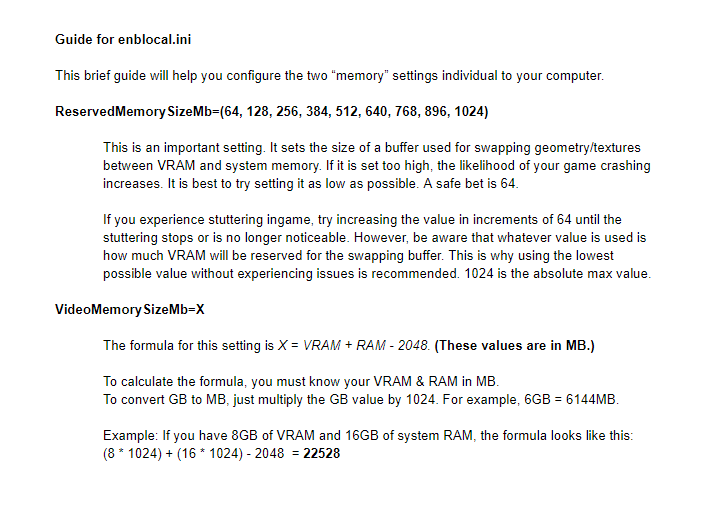
Open the pasted
enblocal.iniand configure according to this guide
STEP 3: Fix Known Issues
Review and apply fixes from the Known Issues guide as needed.
STEP 4: In-Game Configuration
-
Navigate to your
contentfolder and double-click “Launch Ultimate Skyrim.bat”If this doesn’t launch, refer to the Known Issues guide
-
Select a performance profile in the launcher
-
(Optional) Click “Create Desktop Shortcut” for quick access
-
Click “Launch Ultimate Skyrim”
-
Start a new game (Ultimate Skyrim is not compatible with old saves)
-
WAIT until all initialization messages have cleared and you see a blank screen
-
Press Esc/Start to open game menu and select “Mod Configuration”
-
Follow the Mod Configuration guide to adjust settings (recommended: open on separate device for reference)
After Installation
Save Safely
- Wait at least 1 minute after loading before saving
- Avoid saving during combat or heavy script load
- Never save more than once per minute
- Never save within 30 seconds of entering building/cell/dungeon
Need Help?
- Common Issues: See Frequently Asked Questions
- New Player Guide: Gameplay guide for new players
- Support: Search Discord #ultsky-faq for previous answers (no active support available)
Want to Customize?
See Modding Guides - Make sure to read Modding Basics first!
Note: These guides are for Ultimate Skyrim, not Wildlander.